

【手写 Vue2.x 源码】第二十七篇 - Vue 生命周期的实现
| 阿里云国内75折 回扣 微信号:monov8 |
| 阿里云国际,腾讯云国际,低至75折。AWS 93折 免费开户实名账号 代冲值 优惠多多 微信号:monov8 飞机:@monov6 |
一前言
上篇主要介绍了数组依赖收集的实现
本篇Vue 生命周期的实现
二Vue.mixin 介绍
1mixin 简介
Vue2 中可以通过 Vue.mixin 为 vue 进行功能扩展
开发中经常使用 mixin 来为所有组件增加一些生命周期
2mixin 使用
vue 初始化时使用 beforeCreate 生命周期钩子
再通过 Vue.mixin 扩展对 beforeCreate 进行功能扩展
这样在实际执行时多个 beforeCreate 会进行合并
3生命周期的用法
// 使用 Vue.mixin 做全局扩展
Vue.mixin({
  beforeCreate(){
    console.log("全局:mixin-beforeCreate")
  }
})
let vm = new Vue({
  el: '#app',
  // 用法一
  // beforeCreate(){},
  // 用法二数组写法逻辑较多需进行分类时吗可拆分为多个函数
  beforeCreate:[
    function(){
      console.log("局部:new Vue-beforeCreate 1") // A 模块初始化
    },
    function(){
      console.log("局部:new Vue-beforeCreate 2") // B 模块初始化
    }
  ]
});
三Vue 的 Global API
1全局 api 和 实例 api 的使用
// 全局 api对所有组件生效
Vue.component()
// 实例 api仅对当前组件生效
new Vue({
  component:{}
})
2全局 api 的实现原理
new Vue 组件初始化时
- 通过 options 使用实例 api 声明仅对当前组件生效
- 通过 Vue.component 全局声明的属性将被合并到每一个组件中全局生效
四Vue.mixin 实现
1添加 mixin 方法
创建 Vue 全局 api 模块src/global-api
新建 src/global-api/index.js为 Vue 添加 mixi 静态方法:
//src/global-api/index.js

export function initGlobalAPI(Vue) {
  Vue.mixin = function (options) {

  }
}
在 src/index.js 中调用进行 vue global api 的初始化
// src/index.js
import { initGlobalAPI } from "./global-api";
import { initMixin } from "./init";
import { lifeCycleMixin } from "./lifecycle";
import { renderMixin } from "./render";

function Vue(options){
  this._init(options);
}

initMixin(Vue)
renderMixin(Vue)
lifeCycleMixin(Vue)
initGlobalAPI(Vue) // 初始化 global Api

export default Vue;
2实现 Global API
在全局属性Vue.options中存放属性供全局使用
// src/global-api/index.js

export function initGlobalAPI(Vue) {
  // 全局属性Vue.options
  // 功能存放 mixin, component, filte, directive 属性
  Vue.options = {};
  Vue.mixin = function (options) {

  }
  Vue.component = function (options) {}
  Vue.filte = function (options) {}
  Vue.directive = function (options) {}
}
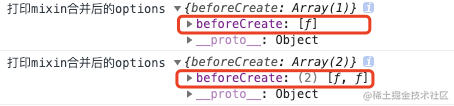
3多个Vue.mixin的合并策略
全局 mixin 也可以被多次调用
Vue.mixin({
  beforeCreate(){
    console.log("全局:mixin-beforeCreate 1")
  }
})
Vue.mixin({
  beforeCreate(){
    console.log("全局:mixin-beforeCreate 2")
  }
})
此时需对全局声明进行合并
Vue.mixin = function (options) {
    // 需将多次传入的 options 与全局属性 Vue.options 进行合并
}
合并策略
第一次合并
parentVal:{}
childVal:{ beforeCreate:fn1 }
合并结果{ beforeCreate:[fn1] }

第二次合并
parentVal:{ beforeCreate:[fn1] }
childVal:{ beforeCreate:fn2 }
合并结果{ beforeCreate:[fn1,fn2] }

所以每次合并需要循环父亲(老值)和儿子(新值)依次进行合并
当新值存在老值不存在时添加到老值中
在 src/utils.js 添加工具方法 mergeOptions
// src/utils.js

/**
 * 对象合并:将childVal合并到parentVal中
 * @param {*} parentVal   父值-老值
 * @param {*} childVal    子值-新值
 */
export function mergeOptions(parentVal, childVal) {
  let options = {};
  for(let key in parentVal){
    mergeFiled(key);
  }
  for(let key in childVal){
    // 当新值存在老值不存在时添加到老值中
    if(!parentVal.hasOwnProperty(key)){
      mergeFiled(key);
    }
  }
  function mergeFiled(key) {
    // 默认合并方法优先使用新值覆盖老值
    options[key] = childVal[key] || parentVal[key]
  }
  return options;
}
4生命周期的合并策略
策略模式将不同生命周期的合并使用不同的策略做区分
// src/utils.js

let strats = {};  // 存放所有策略
let lifeCycle = [
  'beforeCreate',
  'created',
  'beforeMount',
  'mounted'
];
lifeCycle.forEach(hook => {
  // 创建生命周期的合并策略
  strats[hook] = function (parentVal, childVal) {
    if(childVal){ // 儿子有值需要进行合并
      if(parentVal){
        // 父亲儿子都有值父亲一定是数组将儿子合入父亲
        return parentVal.concat(childVal);
      }else{
        // 儿子有值父亲没有值儿子放入新数组中
        // 注意如果传入的生命周期函数是数组已经是数组无需再包成数组
        if(Array.isArray(childVal)){
          return childVal;
        }else{
          return [childVal];
        }
      }
    }else{  // 儿子没有值无需合并直接返回父亲即可
      return parentVal;
    }
  }
})
// src/global-api/index.js

export function initGlobalAPI(Vue) {
  // 全局属性Vue.options
  // 功能存放 mixin, component, filte, directive 属性
  Vue.options = {};
  Vue.mixin = function (options) {
    this.options = mergeOptions(this.options, options);
    console.log("打印mixin合并后的options", this.options);
    return this;  // 返回this,提供链式调用
  }
  Vue.component = function (options) {}
  Vue.filte = function (options) {}
  Vue.directive = function (options) {}
}
5测试
测试 Vue.mixin 中的生命周期合并结果
五全局与实例的生命周期合并
全局生命周期合并完成后还要在和 new Vuechu 初始化中的局部声明再进行合并
new Vue 初始化时会进入 _init 原型方法
// src/init.js#initMixin

Vue.prototype._init = function (options) {
    const vm = this;
    // 此时需使用 options 与 mixin 合并后的全局 options 再进行一次合并
    vm.$options = mergeOptions(vm.constructor.options, options);

    ...
}
打印 vm.$options 查看合并后的结果

问题vm.constructor.options 和 Vue.options的区别
此处的 vm 有可能是 vm 的子类
Vue 的子类对 Vue 可能做了增强子组件可能会继承 Vue

Vue.options 就是指 Vue而 vm.constructor 指子类子组件的构造函数
六生命周期的实现
1创建生命周期执行函数
在src/lifecycle.js生命周期模块中创建执行生命周期钩子函数 callHook
// src/lifecycle.js

/**
 * 执行生命周期钩子
 *    从$options取对应的生命周期函数数组并执行
 * @param {*} vm    vue实例
 * @param {*} hook  生命周期
 */
export function callHook(vm, hook){
  // 获取生命周期对应函数数组
  let handlers = vm.$options[hook];
  if(handlers){
    handlers.forEach(fn => {
      fn.call(vm);  // 生命周期中的 this 指向 vm 实例
    })
  }
}
2添加生命周期钩子
- 当视图渲染前调用钩子: beforeCreate
- 视图更新后调用钩子: created
- 当视图挂载完成调用钩子: mounted
// src/lifecycle.js

export function mountComponent(vm) {
  // vm._render()调用 render 方法
  // vm._update将虚拟节点更新到页面上
  // 初始化流程
  // vm._update(vm._render());
  // 改造
  let updateComponent = ()=>{
    vm._update(vm._render());
  }

  // 当视图渲染前调用钩子: beforeCreate
  callHook(vm, 'beforeCreate');

  // 渲染 watcher 每个组件都有一个 watcher
  new Watcher(vm, updateComponent, ()=>{
    console.log('Watcher-update')
    // 视图更新后调用钩子: created
    callHook(vm, 'created');
  },true)

   // 当视图挂载完成调用钩子: mounted
   callHook(vm, 'mounted');
}
- watcher做视图更新前调用钩子: beforeUpdate
- 视图更新完成后调用钩子: updated
// src/scheduler.js

/**
 * 刷新队列执行所有 watcher.run 并将队列清空
 */
function flushschedulerQueue() {
  // 更新前,执行生命周期beforeUpdate
  queue.forEach(watcher => watcher.run()) // 依次触发视图更新
  queue = [];       // reset
  has = {};         // reset
  pending = false;  // reset
  // 更新完成,执行生命周期updated
}
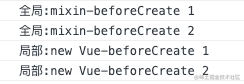
3测试生命周期执行流程
Vue.mixin 中的 2 个 beforeCreate 钩子;
new Vue 中的 2 个 beforeCreate 钩子;
按照合并后的顺序依次执行完成;
七结尾
本篇Vue 生命周期的实现主要涉及以下几点
- Vue.mixin 介绍
- Vue 的 Global API
- Vue.mixin 实现
下篇diff 算法的流程分析
维护日志
- 20210708修复“四-4生命周期的合并策略”当生命周期函数为数组时无需二次包装
- 20210806修复排版问题