Vue3【style-scoped、style-module、类和内联样式、props、练习】
| 阿里云国内75折 回扣 微信号:monov8 |
| 阿里云国际,腾讯云国际,低至75折。AWS 93折 免费开户实名账号 代冲值 优惠多多 微信号:monov8 飞机:@monov6 |
文章目录
style-scoped
- 可以直接通过style标签来编写样式
- 如果直接通过style标签写样式此时编写的样式是全局样式
- 会影响到所有的组件
- 可以为style标签添加一个scoped属性
- 这样样式将成为局部样式只对当前组件生效
如何实现的-
当我们在组件中使用scoped样式时
vue会自动为组件中的所有元素生成一个随机的属性
形如data-v-7a7a37b1
生成后所有的选择器都会在最后添加一个 [data-v-7a7a37b1]
h1 -> h1[data-v-7a7a37b1]
.box1 -> .box1[data-v-7a7a37b1] -
注意
- 随机生成的属性除了会添加到当前组件内的所有元素上
也会添加到当前组件引入的其他组件的根元素上这样设计
是为了可以通过父组件来为子组件设置一些样式。如果要
使引入的其他组件生效引入的组件要为单根组件。
- 随机生成的属性除了会添加到当前组件内的所有元素上
-
<script setup>
import MyBox from "./components/MyBox.vue"
</script>

<template>
    <div class="app">
        <h1>今天天气真不错</h1>
        <div class="box1">App中的box1</div>
        <MyBox></MyBox>
    </div>
</template>

<!--
  可以直接通过style标签来编写样式
    如果直接通过style标签写样式此时编写的样式是全局样式
    会影响到所有的组件

-->
<!-- <style>
h1 {
    background-color: #bfa;
}

.box1 {
    width: 200px;
    height: 200px;
    background-color: yellowgreen;
}
</style> -->

<!-- 可以为style标签添加一个scoped属性
  这样样式将成为局部样式只对当前组件生效
如何实现的
  - 当我们在组件中使用scoped样式时
    vue会自动为组件中的所有元素生成一个随机的属性
    形如data-v-7a7a37b1
    生成后所有的选择器都会在最后添加一个 [data-v-7a7a37b1]
      h1 -> h1[data-v-7a7a37b1]
      .box1 -> .box1[data-v-7a7a37b1]

  - 注意
      - 随机生成的属性除了会添加到当前组件内的所有元素上
        也会添加到当前组件引入的其他组件的根元素上这样设计
        是为了可以通过父组件来为子组件设置一些样式。如果要
        使引入的其他组件生效引入的组件要为单根组件。

-->
<style scoped>
h1 {
    background-color: orange;
}
.box1 {
    width: 200px;
    height: 200px;
    background-color: #bfa;
}

/*
将组件中所有的 h2的字体颜色设置为黄色
.app h2 --> .app h2[xxxxx]   此时子组件的h2不生效因为 样式添加到了单根组件的div上了

.app h2[data-v-7a7a37b1] 没用deep

.app[data-v-7a7a37b1] h2 用了deep
*/
.app :deep(h2) {
    color: yellow;
}

/*
  :global() 全局选择器
*/
:global(div) {
    border: 1px red solid;
}
</style>

<!-- <style>
div {
    border: 1px red solid;
}
</style> -->
style-module
- 自动的对模块中的类名进行hash化来确保类名的唯一性
- 在模板中可以通过(默认) $style.类名 使用
- 也可以通过module的属性值来指定变量名
<script setup>
import MyBox from "./components/MyBox.vue"
</script>

<template>
    <div class="app">
        <h1>今天天气真不错</h1>
        <div :class="classes.box1">App中的box1</div>
        <MyBox></MyBox>
    </div>
</template>
<!--
  css 模块
    - 自动的对模块中的类名进行hash化来确保类名的唯一性
    - 在模板中可以通过(默认) $style.类名 使用
    - 也可以通过module的属性值来指定变量名

-->
<style module="classes">
.box1 {
    background-color: #bfa;
}
</style>
类和内联样式
<script setup>
const arr = ["box1", "box2", "box3"]
const arr2 = [{ box1: true }, { box2: false }, { box3: true }]
const style = {
    color: "red",
    backgroundColor: "#bfa"
}
</script>
<template>
    <h1 class="header">我爱Vue</h1>
    <div :class="arr" :style="style">我是div</div> <!--相当于<div class="box1 box2 box3>" -->
    <div :class="arr2" :style="style">我是div</div>
</template>
<style scoped>
.header {
    background-color: orange;
}
</style>
props
- 子组件中的数据通常不会在子组件中直接定义这样会导致数据和视图发生耦合
- 子组件中的数据通常会在创建组件实例时确定
- 父组件可以通过 props 来将数据传递给子组件
- 使用props
- 先在子组件中定义props
- 父组件可以通过props来向子组件传递数据
- 注意父组件传递给子组件的props都是只读的无法在子组件修改
即使可以修改我们也尽量不要在子组件中去修改父组件的数据
如果非得要改具体方法后边再讲自定义事件 - 属性名
- 定义属性名时属性名要遵循驼峰命名法
- 注意父组件传递给子组件的props都是只读的无法在子组件修改
App.vue
<script setup>
import MyBox from "./components/MyBox.vue"
import { ref } from "vue"

const count = ref(0)
const obj = ref({
    count: 0
})
</script>
<template>
    <h1>我是App根组件</h1>
    <MyBox :count="123" :obj="obj" maxLength="1231"></MyBox>
    <button @click="obj.count++">点我一下</button>
</template>
Mybox.vue
<script setup>
/*
        父组件可以通过props来向子组件传递数据
        注意父组件传递给子组件的props都是只读的无法在子组件修改
            即使可以修改我们也尽量不要在子组件中去修改父组件的数据
            如果非得要改具体方法后边再讲自定义事件

        属性名
            - 定义属性名时属性名要遵循驼峰命名法

    */

// 定义props
// count = 0
// obj = {count = 0}
const props = defineProps(["count", "obj", "maxLength"])

const props = defineProps({
  count: Number,//类型限制实际作用不大
  obj: Object,
  isCheck: Boolean,
  maxLength: {
    type: String,//maxLength的类型
    required: true,//maxLength是否必传
    default: "哈哈",
    validator (value) {//检查传过来的参数是否合法返回false不合法
      return value !== "嘻嘻"
    }
  }
})

console.log(props)
</script>

<template>
  <div>
    <h1>{{ props.maxLength }}</h1>
    <h2>我是子组件 MyBox {{ props.obj.count }}</h2>
    <button @click="props.count++">MB的按钮</button> <!--无法修改-->
    <button @click="props.obj.count++">MB的按钮</button> <!--可以修改obj不可修改但属性可以修改。不建议这样操作-->
    <hr />
  </div>
</template>

<style scoped>
div {
  color: tomato;
}
</style>
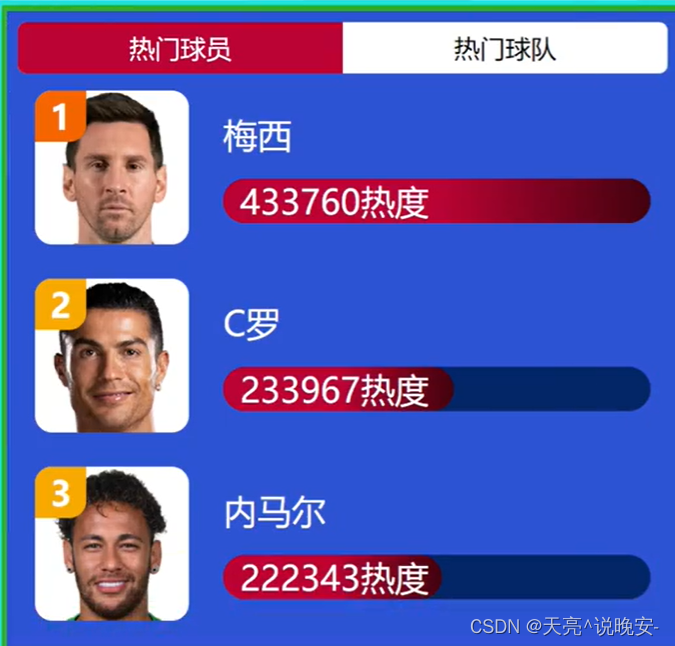
练习

App.vue
<script setup>
import { reactive, ref } from 'vue'
import TabItem from './components/TabItem.vue'
import TabList from './components/TabList.vue'
import Tab from './components/Tab.vue'


const players = reactive([
  {
    name: '梅西',
    img: '/images/messi.png',
    rate: 1,
    hot: 437890
  },
  {
    name: 'C罗',
    img: '/images/ronaldo.png',
    rate: 2,
    hot: 397890
  },
  {
    name: '内马尔',
    img: '/images/neymar.png',
    rate: 3,
    hot: 367890
  }
])

const teams = reactive([
  {
    name: '巴西',
    img: '/images/巴西.jpg',
    rate: 1,
    hot: 437890
  },
  {
    name: '法国',
    img: '/images/法国.jpg',
    rate: 2,
    hot: 357890
  },
  {
    name: '荷兰',
    img: '/images/荷兰.jpg',
    rate: 3,
    hot: 267890
  }
])
// 获取最大热度也就是排名第一人的热度
const playMaxHot = players[0].hot
const teamMaxHot = teams[0].hot
</script>

<template>
  <Tab>
    <template #0>
      <TabList :items="players" :maxHot="playMaxHot"></TabList>
    </template>
    <template #1>
      <TabList :items="teams" :maxHot="teamMaxHot"></TabList>
    </template>
  </Tab>
</template>
Tab.vue
<script setup>
import { ref } from 'vue'

//创建一个变量来记录选项卡的状态
const current = ref(0) //0 表示球员 1表示球队
</script>

<template>
  <!-- 选项卡的外部容器 -->
  <div class="tab-wrapper">
    <!-- 选项卡的头部 -->
    <header class="tab-head">
      <!-- 定义两个按钮 -->
      <div @click="current = 0" class="tab-button" :class="{active : current === 0}">热门球员</div>
      <div @click="current = 1" class="tab-button" :class="{ active: current === 1 }">热门球队</div>
    </header>
    <!-- 选项卡的主体 -->
    <div class="main">
      <div v-show="current === 0">
        <!-- 球员 -->
        <slot name="0"></slot>
      </div>
      <div v-show="current === 1">
        <!-- 球队 -->
        <slot name="1"></slot>
      </div>
    </div>
  </div>
</template>

<style scoped>
.tab-wrapper {
  box-sizing: border-box;
  width: 800px;
  padding: 20px;
  background-color: rgb(45, 83, 211);
  margin: 0 auto;
}

.tab-head {
  display: flex;
  border-radius: 10px;
  overflow: hidden;
}

.tab-button {
  background-color: #fff;
  font-style: 30px;
  padding: 10px 0;
  text-align: center;
  flex: auto;
  transition: 0.5s;
}

.tab-button:not(.active):hover {
  color: rgb(187, 3, 52)
}

.active {
  background-color: rgb(187, 3, 52);
  color: #fff;
}
</style>
TabList.vue
<script setup>
import TabItem from './TabItem.vue'

//定义参数
const props = defineProps(["items", "maxHot"])
</script>
<template>
  <div class="tab-list">
    <TabItem v-for="player in props.items" :item="player" :maxHot="props.maxHot"></TabItem>
  </div>
</template>

<style scoped>
.tab-list {
  margin: 30px
}
</style>
TabItem.vue
<script setup>
import Photo from './Photo.vue'
import HotBar from './HotBar.vue'
//创建一个响应式对象

const props = defineProps(['item'])
const item = props.item

</script>
<template>
  <div class="tab-item">
    <!-- 图片 -->
    <Photo :src="item.img" :alt="item.name" :rate="item.rate"></Photo>
    <!-- 描述 -->
    <div class="desc">
      <span class="name">{{ item.name }}</span>
      <HotBar :hot="item.hot" :maxHot="555555"></HotBar>
    </div>
  </div>
</template>

<style scoped>
.tab-item {
  display: flex;
  margin-bottom: 40px;
}


.desc {
  display: flex;
  flex-flow: column;
  justify-content: space-evenly;
  font-size: 30px;
  color: #fff;
  flex: auto;
  margin-left: 30px;
}
</style>
HotBar.vue
<script setup>
import { computed } from 'vue';

const props = defineProps(['hot', 'maxHot'])

const width = computed(() => {
  //计算百分比
  return props.hot / props.maxHot * 100 + '%'
})
</script>

<template>
  <div class="hot-bar">
    <div class="inner">{{ props.hot }}热度</div>
  </div>
</template>

<style scoped>
.hot-bar {
  background-color: rgb(3, 37, 103);
  border-radius: 20px;
  text-indent: 0.5em;
}

.inner {
  width: v-bind(width);
  border-radius: 20px;
  background-image: linear-gradient(90deg,
      rgba(187, 3, 52) 50%,
      rgba(66, 2, 12));

  white-space: nowrap;
  /*文字不换行 */
}
</style>
Photo.vue
<script setup>
import { computed } from 'vue'

const props = defineProps(["src", "alt", "rate"])
const color = computed(() => {
  //判断颜色
  if (props.rate == 1) {
    return "rgb(254,45,70)"
  } else if (props.rate == 2) {
    return "rgb(245,102,1)"
  } else {
    return "rgb(247, 169, 1)"
  }
})

</script>
<template>
  <!-- 图片 -->
  <div class="photo">
    <img :src="props.src" alt="props.alt">
    <span>{{ props.rate }}</span>
  </div>
</template>

<style scoped>
.photo {
  position: relative;

  width: 150px;
  background-color: #fff;
  border-radius: 20px;
  overflow: hidden;
}

.photo img {
  width: 100%;
  vertical-align: middle;
}

.photo span {
  position: absolute;
  left: 0;
  top: 0;
  width: 50px;
  height: 50px;
  background-color: v-bind(color);
  font-size: 20px;
  font-weight: bold;
  color: #fff;
  display: flex;
  justify-content: center;
  align-items: center;
  border-bottom-right-radius: 20px;
}
</style>

